Hopefully by now you are feeling like your dream of painting a piece of furniture is possible and attainable. Trust me, it is. If you put your mind to it and don't allow yourself to feel overwhelmed, you certainly can do this. Use those two posts to give you encouragement. You can do this... certainly, if I can do it, you can.
I've given you the how to and the encouragement.... Now which paint do you choose??? Chalk Paint or Latex??? I would add spray paint to this list, but I didn't have luck with my spray paint venture a few years ago. It chipped easily and was a mess. Could have been the piece I used and the fact that I didn't sand it at all but it didn't turn out well.
Pros and Cons of Latex:
Pro:
1. Cheap
2. Tons of colors from which to choose
3. Different finish types (flat, gloss, semi-gloss, etc.)
4. So easily available.
5. Usually a sample size will over your piece (so 2.50 for paint for a piece works).
6. Can get at any hardware store or Walmart.
Con:
1. Not sure I'm fond the finish- next time I will use a satin finish...
2. Tons of colors from which to choose.
3. Cannot attest to durability yet. I just did a piece with it this week.
4. need to sand after the layer of primer with very fine sand paper (220).
Pros and Cons of Chalk Paint:
Pro:
1. Great coverage- one coat usually is enough.
2. Great colors from which to choose - limited but great.
3. Can do multiple pieces with one quart
4. Velvety finish
Cons:
1. Pricey- but I just saw online that it is available in 4 oz size now instead of just quarts in some areas. That may be enough for a smaller piece.
2. Limited colors
3. Only sold in boutiques.
A note about Chalk Paint...
When you go to the boutique to purchase chalk paint (my favorite paint by the way), they will ask if you want the clear wax. Let me tell you, the wax is a pain in the butt. It requires application in a certain way then you have to buff it out after it dries... do it again and yet a third time...
On the first dresser, I did this and I noticed that the blue started to turn green when I buffed so I stopped buffing...
On the piano, I chose to use polycrylic instead of the clear wax. Life was much easier and I liked the product just as much.
So, I say skip the expensive wax and get the polycrylic that will cover several pieces in 1 quart easily.
My personal preference between the paints is definitely chalk paint. It can easily be used indoors and if not waxed or finished with polycrylic can be a chalkboard. I just like the application and finish of it better than latex.
Friday, July 11, 2014
Thursday, July 10, 2014
Amateur's view of painting furniture #2
So you read my post yesterday did you? Interested in what to do to paint furniture for the first time??? Let me help you out...
Disclaimers:
1. I have not worked with laminate or veneer so I cannot give pointers on anything there as far as painting goes, but have heard Annie Sloan Chalk Paint will go right over it with not problem. I actually have a bookcase that fits this description and may try to paint it with ASCP just to see how it works...
2. I'm not a professional..
3. I learn as I go and so something I write here may not work for you.. feel free to shoot me an email to ask questions. I may refer you to Lowe's in Stow for their help as they have helped me in the past. I actually had them say to me... "You're back?"
4. I cannot help with spray painting furniture. It actually scares me because of runs and drips and bubbles, but I've read many posts that swear by it.
What do you need:
1. a piece of furniture- obviously.
2. paint
3. a sander and sand paper (rough, fine and very fine) if you have rough patches on your pieces and to just rough it up a little for better paint adhesion.
4. primer- possibly (depending on the piece and type of paint you use). Remember for stained items you are painting over, I recommend CoverStain...

5. paint brush- I prefer the purple handle short brush by Blue Hawk and Wooster. I believe Purdy has one, but I only found the oil based brush at my Lowe's that is by them similar to the latex short brush.

6. foam brush for finishing layer
7. finishing protector (polyurethane, polycrylic, clear wax for ASCP - see post 3 tomorrow about this).
8. Cheesecloth
9. drop cloth or sheet
10. Stain and staining cloths if you are staining
11. soap and water and a cloth.
Step 1: Wash the piece and let it dry. Seriously, don't forget this step. It needs a good scrub down to get rid of debris and dust. If you skip this step, you get dust in the brush which affects the paint color and you don't want that. I made the mistake once... never again.
Step 2: Sand. You can use a hand sander (my favorite is my little mouse type sander) or just sand by hand. If you are having to fix divots and such in the piece. Also, if it has a shiny finish you want to use at least a 120 grit sand paper to quickly and easily scuff up the piece for paint adhesion.
Step 3: wipe down with cheesecloth (a damp cloth works, but then you're waiting for it to dry again).
Step 4: If you are working with a piece that it stained and going to simply paint it, use Coverstain primer and paint that on. You can use a roller, but I learned that sometimes that doesn't work out very well for me, so I stick to hand painting.
Step 5: Paint.
Step 6: Finish with whatever top coat you want. Follow the instructions. Be sure NOT to shake the can. You get bubbles and issues if you do... not good.
Step 7: After drying, put in any hardware and such. Please allow good drying time for this.
For help deciding on a paint see tomorrow's post. This is between latex and chalk.... I cannot help with paint color... that's on you!
Disclaimers:
1. I have not worked with laminate or veneer so I cannot give pointers on anything there as far as painting goes, but have heard Annie Sloan Chalk Paint will go right over it with not problem. I actually have a bookcase that fits this description and may try to paint it with ASCP just to see how it works...
2. I'm not a professional..
3. I learn as I go and so something I write here may not work for you.. feel free to shoot me an email to ask questions. I may refer you to Lowe's in Stow for their help as they have helped me in the past. I actually had them say to me... "You're back?"
4. I cannot help with spray painting furniture. It actually scares me because of runs and drips and bubbles, but I've read many posts that swear by it.
What do you need:
1. a piece of furniture- obviously.
2. paint
3. a sander and sand paper (rough, fine and very fine) if you have rough patches on your pieces and to just rough it up a little for better paint adhesion.
4. primer- possibly (depending on the piece and type of paint you use). Remember for stained items you are painting over, I recommend CoverStain...
5. paint brush- I prefer the purple handle short brush by Blue Hawk and Wooster. I believe Purdy has one, but I only found the oil based brush at my Lowe's that is by them similar to the latex short brush.
6. foam brush for finishing layer
7. finishing protector (polyurethane, polycrylic, clear wax for ASCP - see post 3 tomorrow about this).
8. Cheesecloth
9. drop cloth or sheet
10. Stain and staining cloths if you are staining
11. soap and water and a cloth.
Step 1: Wash the piece and let it dry. Seriously, don't forget this step. It needs a good scrub down to get rid of debris and dust. If you skip this step, you get dust in the brush which affects the paint color and you don't want that. I made the mistake once... never again.
Step 2: Sand. You can use a hand sander (my favorite is my little mouse type sander) or just sand by hand. If you are having to fix divots and such in the piece. Also, if it has a shiny finish you want to use at least a 120 grit sand paper to quickly and easily scuff up the piece for paint adhesion.
Step 3: wipe down with cheesecloth (a damp cloth works, but then you're waiting for it to dry again).
Step 4: If you are working with a piece that it stained and going to simply paint it, use Coverstain primer and paint that on. You can use a roller, but I learned that sometimes that doesn't work out very well for me, so I stick to hand painting.
Step 5: Paint.
Step 6: Finish with whatever top coat you want. Follow the instructions. Be sure NOT to shake the can. You get bubbles and issues if you do... not good.
Step 7: After drying, put in any hardware and such. Please allow good drying time for this.
For help deciding on a paint see tomorrow's post. This is between latex and chalk.... I cannot help with paint color... that's on you!
Wednesday, July 9, 2014
An amateur's view of painting furniture.
It all started when I saw a dresser on a curb.. sitting there... lonely..... deserted..... looking pathetic. I stopped. I'd seen dressers people had refinished and I wanted a buffet or something for in the dining room. It was 2 houses down, had good bones and I decided I needed it.... well, wanted it. I figured I could give this furniture venture a try and see if I can actually refinish or makeover a piece of furniture. That was last August.
What I didn't know about that piece of furniture was that it was going to lead me into a hobby I both love and hate. I love how everything looks. I love picking out paint colors. I love seeing a transformation and being the creator of that transformation. I love sanding paint off to find what lies underneath. I love looking at hardware and painting by hand. Yes, I have painted all of my furniture by hand. I hate how long it can take and that can take time away from my little boy... however, it is an escape for me. Believe it or not.
By the way, that dresser turned out absolutely lovely. So much so that a friend asked me to paint her piano despite the fact that I had only refinished one piece, she trusted me with her daddy's piano. I must admit to being totally intimidated.
I was correct in being intimidated with the piano. There were some stains and rough patches. It needed some serious TLC... It taught me so much. I am so thankful for the opportunity. More to follow on what I learned from each piece below.
The last piece of furniture I did, my third piece, was in need of serious TLC but again had good bones... Oh and did I mention that it was at the same house from which the first dresser came from?? Again, sitting lonely and pathetic on the curb for over 24 hours (I was out of town when it was put there)... clearly it was meant for me to refinish....


This dresser taught me much more than I had ever thought of before. Because of the rotted out bottom, broken tracks for the bottom drawer and rotted out back, I learned to use a jigsaw and circular saw. I now feel unstoppable!
FYI the total cost for this dresser including paint and such was $12. Doesn't include the amount of time spent working on it (at least 4 hours a day for 3 days- includes drying time on paint and primer and poly).
Lessons I've learned... piece by piece:
Dresser 1:
1. I love doing this work.
2. It's hard work.
3. It can take a long time and a lot of prep work.
4. The outcome is so worth it.
5. Chalk paint is so easy to use.... the wax not so much.
6. I love staining things.
7. Polyurethane is a pain, but such a lasting finish.
Piano:
1. Sometimes even with chalk paint you have to prime a piece.
2. Cover stain primer (oil based) is a pain in the rear to work with, but does a fantastic job. When I started the piano, I didn't use any primer because truly you don't need to with chalk paint - so they tell you... and I didn't for dresser 1 but that was a darker color. I'll explain more in a post tomorrow.
3. It was fun to tear apart the piano and clean it all out- goodbye spider webs.
4. Working in a garage is not my favorite things, but it does suffice. I prefer open air but I can't move a piano by myself!
5. Chalk paint is wonderful, but can be temperamental... maybe I should try latex for the first time on my next project.
6. Polycrylic is my favorite. Shorter dry time and just as easy an application as polyurethane without the yellowing effect.
Dresser 2:
1. Don't be afraid to tackle a harder project. It teaches you so many new things that help you gain confidence.
2. Primer is your friend.
3. Sometimes crackle paint is your worst enemy... It gummed up the sander... peeled off in smaller pieces (when there was a large piece, I was stoked).
4. Using latex for the first time... it went on easy but not as thick as chalk paint (which I still prefer but not at the price they sell it).
5. I still love polycrylic.
6. Hobby Lobby has lovely drawer pulls at a price, but Habitat Restore has some good ones to use as is or paint for a fraction of the cost.
So, you have your eyes set on a piece of furniture you want to refinish... Go for it.
For the least labor intensive work, I can't tell you what to do. I know I have used Annie Sloan Chalk Paint and said it's easiest but the piano taught me that isn't always the case. They say you can just paint over whatever with chalk paint. My experience was I couldn't really with the piano due to the stain. There is a disclaimer made by the ASCP company that some stains put on furniture during a certain time period can lead to bleed through. Let me tell you that is totally the truth and when that happens, you must get out the cover stain primer. It must be Cover Stain. I tried a different primer first and it didn't work. Imagine repainting something 4 times.... Yep, that's what I learned with the piano. Use cover stain. It's a pain... it stinks... it's gives a lovely finished product because it gets the job done.
I will say I love the look of furniture covered with Annie's Chalk Paint, a nice velvety finish... It was easy to use with the first dresser where I covered over black paint with no problems. Covering over something with stain was a bit more challenging. Latex was nice and easy. Easy clean up (chalk paint is easy clean up as well) and cheap... cheap.. cheap.... I'm not sure on the durability of it as I just did this project. I know the dresser with chalk paint is still going strong... as in not easily chipped off or anything. I pray the latex paint does well after a year as well.
Overall, when you set out to paint furniture, you may love it or hate it. If you're one of the people I've spoken with about painting furniture, you may swear at me and curse me and hate my guts when going through the process... depending on how you go about it. (Are you sanding??? staining??? Polycrylic? Polyurethane?? chalk paint? Primer?? Latex paint??? Spray paint???) It's all so overwhelming!
Tomorrow I will set out to give pointers on painting furniture when you're just getting started... from an amateur's point of view... because that's what I am....
What I didn't know about that piece of furniture was that it was going to lead me into a hobby I both love and hate. I love how everything looks. I love picking out paint colors. I love seeing a transformation and being the creator of that transformation. I love sanding paint off to find what lies underneath. I love looking at hardware and painting by hand. Yes, I have painted all of my furniture by hand. I hate how long it can take and that can take time away from my little boy... however, it is an escape for me. Believe it or not.
By the way, that dresser turned out absolutely lovely. So much so that a friend asked me to paint her piano despite the fact that I had only refinished one piece, she trusted me with her daddy's piano. I must admit to being totally intimidated.
I was correct in being intimidated with the piano. There were some stains and rough patches. It needed some serious TLC... It taught me so much. I am so thankful for the opportunity. More to follow on what I learned from each piece below.
 |
| Before... |
 |
| After... |
 |
| Closer up of the damaged area |
 |
| Another midrange view. |
The last piece of furniture I did, my third piece, was in need of serious TLC but again had good bones... Oh and did I mention that it was at the same house from which the first dresser came from?? Again, sitting lonely and pathetic on the curb for over 24 hours (I was out of town when it was put there)... clearly it was meant for me to refinish....
Before
The rotted back... the only thing aside from a drawer that I thought was wrong...
 |
| Front view... Forgot to get a back view... maybe I will today... |
This dresser taught me much more than I had ever thought of before. Because of the rotted out bottom, broken tracks for the bottom drawer and rotted out back, I learned to use a jigsaw and circular saw. I now feel unstoppable!
FYI the total cost for this dresser including paint and such was $12. Doesn't include the amount of time spent working on it (at least 4 hours a day for 3 days- includes drying time on paint and primer and poly).
Lessons I've learned... piece by piece:
Dresser 1:
1. I love doing this work.
2. It's hard work.
3. It can take a long time and a lot of prep work.
4. The outcome is so worth it.
5. Chalk paint is so easy to use.... the wax not so much.
6. I love staining things.
7. Polyurethane is a pain, but such a lasting finish.
Piano:
1. Sometimes even with chalk paint you have to prime a piece.
2. Cover stain primer (oil based) is a pain in the rear to work with, but does a fantastic job. When I started the piano, I didn't use any primer because truly you don't need to with chalk paint - so they tell you... and I didn't for dresser 1 but that was a darker color. I'll explain more in a post tomorrow.
3. It was fun to tear apart the piano and clean it all out- goodbye spider webs.
4. Working in a garage is not my favorite things, but it does suffice. I prefer open air but I can't move a piano by myself!
5. Chalk paint is wonderful, but can be temperamental... maybe I should try latex for the first time on my next project.
6. Polycrylic is my favorite. Shorter dry time and just as easy an application as polyurethane without the yellowing effect.
Dresser 2:
1. Don't be afraid to tackle a harder project. It teaches you so many new things that help you gain confidence.
2. Primer is your friend.
3. Sometimes crackle paint is your worst enemy... It gummed up the sander... peeled off in smaller pieces (when there was a large piece, I was stoked).
4. Using latex for the first time... it went on easy but not as thick as chalk paint (which I still prefer but not at the price they sell it).
5. I still love polycrylic.
6. Hobby Lobby has lovely drawer pulls at a price, but Habitat Restore has some good ones to use as is or paint for a fraction of the cost.
So, you have your eyes set on a piece of furniture you want to refinish... Go for it.
For the least labor intensive work, I can't tell you what to do. I know I have used Annie Sloan Chalk Paint and said it's easiest but the piano taught me that isn't always the case. They say you can just paint over whatever with chalk paint. My experience was I couldn't really with the piano due to the stain. There is a disclaimer made by the ASCP company that some stains put on furniture during a certain time period can lead to bleed through. Let me tell you that is totally the truth and when that happens, you must get out the cover stain primer. It must be Cover Stain. I tried a different primer first and it didn't work. Imagine repainting something 4 times.... Yep, that's what I learned with the piano. Use cover stain. It's a pain... it stinks... it's gives a lovely finished product because it gets the job done.
I will say I love the look of furniture covered with Annie's Chalk Paint, a nice velvety finish... It was easy to use with the first dresser where I covered over black paint with no problems. Covering over something with stain was a bit more challenging. Latex was nice and easy. Easy clean up (chalk paint is easy clean up as well) and cheap... cheap.. cheap.... I'm not sure on the durability of it as I just did this project. I know the dresser with chalk paint is still going strong... as in not easily chipped off or anything. I pray the latex paint does well after a year as well.
Overall, when you set out to paint furniture, you may love it or hate it. If you're one of the people I've spoken with about painting furniture, you may swear at me and curse me and hate my guts when going through the process... depending on how you go about it. (Are you sanding??? staining??? Polycrylic? Polyurethane?? chalk paint? Primer?? Latex paint??? Spray paint???) It's all so overwhelming!
Tomorrow I will set out to give pointers on painting furniture when you're just getting started... from an amateur's point of view... because that's what I am....
Saturday, September 1, 2012
Just journaling....
It's been an interesting month. August was harder on me this time. It could be the new position at school, in addition to teaching. It could be because I was really struggling with lil man going to preschool and getting bigger. Maybe it had something to do with feeling unprepared for the school year or the fact that I hadn't gotten anything on my list of things to do this summer done. Don't get me wrong, I did some things, but the majority of it was chilling with my boy and enjoying life with him.... til July 31 when things got really hectic.
I was doing well and holding it together and then things started to fall apart in more ways than I anticipated. Maybe some of it was my fault. Maybe some of it was I just took on too much and attempted to do too much. Maybe it's just how things are supposed to be. Only God knows really.
When school started, I spent 4 days crying from stress and anxiety. Yep, I got that bad. I ate crappy foods, didn't make the farmers' market as I usually did, didn't clip coupons or even really shop for food. Meal planning? I couldn't even think about it. I think it was mild momentary depression. It seemed like everything, and I mean everything (relationships of all kinds, work, home) was falling apart.
Then a magical thing happened.... I laughed... for the first time in over a week and a half. It felt great. I felt light. What was the change? I gave up thinking I could do everything and relied on God to just take it away and help me to do what I could in that moment. It felt great.
Then I woke up the next morning. The toilet had overflowed all night. We had water all over the bathroom, through the kitchen ceiling, the kitchen cabinets, on the counter and the kitchen floor, down into the basement. I didn't think anything of it. Cleaned everything up with towels and whatever, told the hubs what happened. He said he would take a half day off work later in the day to help with cleaning up. He came home to a hot, smelly house. He called a company to come out and the insurance company. He handled it all while I worked away. I was stressed, yes, but not crying stressed. Just overwhelmed and defeated stressed. That stressed that makes you feel worn out. Sometimes that feeling is almost as comfy as a pair of old jeans. It just is. It makes you realize that you can't do it all. That you need help. That sometimes it's just time to stop and slow down. You're tired from it all. The good thing about that stress, you have to rely on something bigger than you to make it through. For me, that is Jesus Christ, my Savior. He actually gave me a genius idea (well, maybe it wasn't from him, I don't know). Maybe this is God's way of reminding me that I'm not in control and to rely on Him more. Letting me know that I can't control it all and nor should I attempt to. Do you know what a weight it was that came off my shoulders? It was/is amazing.
I am lighter now. I may have lost a few friends. I may mess up in my new leadership role. I may even mess up in parenting and marriage. I can't control it all and am just grateful that I don't have to. That really the only relationship that matters is the one I have with God and when that is in perspective, so will be the others. Growing that relationship will help the marriage, parenting and others. So for now, I'm focusing on that and my family. Yes, I'll still have to work, but the those relationships are the ones I am choosing to focus on for now. It is needed and it took the stressors of the month to get me to this point. I must say, I'm kind of glad for them..... Now, bring on the chaos of home repairs.
Monday, August 6, 2012
Something to come....
I had a garage sale. So did my neighbor. I found this at their garage sale for $0.75.


More to come... hopefully soon...


More to come... hopefully soon...
Saturday, August 4, 2012
Making the menu pretty!
I love my command center. The white board with the pen holder and notecard holder for jotting down messages when the menu was on the white board etc. I just didn't really care for the white board as the menu spot. Why, I couldn't tell you.
One day, hubby and I were cleaning out a room and I came across an old mirror that was kind of stained and had a fog on it in spots and some yellow dots on it. I didn't want to let it go as I liked the styling of it. It's quaint and could easily have a new purpose. So, I figured I would turn it into a menu board in the kitchen.
With a little primer, left over white paint from the trim in the dining room and chalkboard paint from E's playroom, I took to turning the mirror into a menu board. I chose to use the white paint because it goes with everything (we plan on repainting the kitchen in the next year or two so I can update it then) and because I had a lot of it available!
In a matter of 2 days, I had a new menu board. Next it was where to hang it. I decided I would put it right by the back kitchen door above our current ginormous trash can (one day we'll hide it away and use a small one that fits into a pantry or something). Confession, the trash can is not ginormous, it's 13 gallon capacity just sits on the wall by itself beside (and behind when open) the kitchen door.
I love where I hung it as I can see exactly what I need to do and if I forget on the way out in the morning, there's a quick reminder for me to do a 5 second turn and get whatever from the freezer for dinner that night or the next night. So nice!
Best thing, this cost us nothing as we already had everything from previous projects! :) Yippee Skippy!!!
One day, hubby and I were cleaning out a room and I came across an old mirror that was kind of stained and had a fog on it in spots and some yellow dots on it. I didn't want to let it go as I liked the styling of it. It's quaint and could easily have a new purpose. So, I figured I would turn it into a menu board in the kitchen.
 |
| Yep, them are my legs and the crocs flip flops I've had for over 5 years. Love those things! |
With a little primer, left over white paint from the trim in the dining room and chalkboard paint from E's playroom, I took to turning the mirror into a menu board. I chose to use the white paint because it goes with everything (we plan on repainting the kitchen in the next year or two so I can update it then) and because I had a lot of it available!
In a matter of 2 days, I had a new menu board. Next it was where to hang it. I decided I would put it right by the back kitchen door above our current ginormous trash can (one day we'll hide it away and use a small one that fits into a pantry or something). Confession, the trash can is not ginormous, it's 13 gallon capacity just sits on the wall by itself beside (and behind when open) the kitchen door.
 |
| No, I didn't take a pic of that corner as it needs cleaning and I didn't feel like doing it before snapping the picture. |
I love where I hung it as I can see exactly what I need to do and if I forget on the way out in the morning, there's a quick reminder for me to do a 5 second turn and get whatever from the freezer for dinner that night or the next night. So nice!
Best thing, this cost us nothing as we already had everything from previous projects! :) Yippee Skippy!!!
Friday, July 20, 2012
MAPS Museum visit- on the fly...
Hubby told me he decided to take an impromptu long weekend this weekend. He asked me what I wanted to do. In my head I said, "You to take care of cleaning the house, making dinner (not take out), take lil man out and just let me have a day to myself- after you've cleaned the house." What I really said was "I don't know."
I decided to take lil man to the library for storytime in the morning and let the hubby sleep in as he was out fishing really late the night before. It helped that lil man woke up extremely cranky and not wanting to listen to a thing I said. I was exhausted an hour into the day. But, let's make the most of it.
We had fun at the library and picked up books on the theme of the week- spiders.
When we came home, hubs was up. He said he wanted to go to Chuck E. Cheese. I said he could go without me so I could have time. He didn't really like that idea as he wanted us all to do something. I wanted my time but can appreciate the need and desire for good quality family time. He mentioned going to Cleveland to a museum. My wheels started spinning. It was noon. Museums close at 5. It's a 45 minute drive and someone gets cranky between 2 and 4. Hmm... not a great idea. I started looking at museums near us in the Akron/Canton area.
Google never fails. It gave me a list and I started to go through thinking what would be good. The Fossil museum would be cool, but we have a play date there with friends next week. Something else... Then I stumbled upon the MAPS Museum near the Akron Canton Airport. I was leary at first. Not sure what it held. The pictures shows planes but also displays. Lil man, at 3, would certainly not be into displays. I talked it over with hubs and we headed out to check out the museum with the idea that if the museum is not the best for lil man, we would head to Chuck E Cheese.
This museum, while small, is FANTASTIC! I cannot express enough how much I absolutely loved this place. I think I was more in love with it than either of my boys. It was the coolest thing ever. There were planes all over in the gift shop area hanging from the ceiling (what I want to do in lil man's room). There were all kinds of planes everywhere in the museum... hanging from the ceiling, on the ground, outside (thankfully the weather cleared a little). There were descriptions of everything military plane. It was so cool.


The greatest surprise came to us while at the museum. We saw in the corner the gondola of the Goodyear Blimp. This is a huge thing in our house. Hubby used to work for the blimp (landing crew) and in our dating years, I would visit him at the hanger and sit in the blimp gondola. What was great about it was it was the exact same gondola he worked with- the GZ22. It had crashed a few years after he left (to settle down and be married to moi. Too much travel for him to be newly married and such) and apparently MAPS got the gondola of the blimp that crashed. The very one I sat in and explored (not that there's much to explore, but I looked into the balloon part of the blimp in that gondola and sat in the pilot's chair. Good times. Hubby said many memories came flooding back and he reminisced with one of the gentlemen working/volunteering with MAPS. Needless to say, this was lil man's favorite part of the museum and he had a ton of fun in the blimp. We sat in there for about 20 minutes just letting him play on one of the two trips to this exhibit.


After looking at the planes in the hanger and outside, we headed inside to use the restroom (which was the nicest and cleanest I had ever seen in a museum. I almost took a pic but decided better not) and tour the Heroes Hall.
The Heroes Hall was filled with all kinds of really neat things. There were uniforms of all eras displayed, planes and helicopters, various stories of the heroes from the Akron Canton area who served (which was so cool to read). What I loved best about the Heroes Hall was the handwritten pieces they had. There was a handwritten flight log listing the date, time and mission they were on. There were lots of handwritten notes (my favorite things in the world to pour over) to family and friends from these heroes. It was wonderful and beautiful and reminded me of the book I just finished and can't stop thinking about, The Bungalow.
I loved this museum and will be back. I think it may become a semi-annual event. It's fantastic. If that's not enough to convince you to visit, the guest book I signed had people who visited from Oklahoma, Florida and other places who said it was a great museum as well. It really is. We saw kids of all ages who enjoyed it and some on guided tours (not something we can do with our lil man yet).
As always, I was in no way, shape or form compensated for this post. I simply loved this museum and can't wait to go back. It really is a gem.
Tomorrow, we hit our next annual event... The hotair balloon festival for the Football Hall of Fame Inauguration. It's our 3rd year attending. It's something we wouldn't pass up.
I decided to take lil man to the library for storytime in the morning and let the hubby sleep in as he was out fishing really late the night before. It helped that lil man woke up extremely cranky and not wanting to listen to a thing I said. I was exhausted an hour into the day. But, let's make the most of it.
We had fun at the library and picked up books on the theme of the week- spiders.
When we came home, hubs was up. He said he wanted to go to Chuck E. Cheese. I said he could go without me so I could have time. He didn't really like that idea as he wanted us all to do something. I wanted my time but can appreciate the need and desire for good quality family time. He mentioned going to Cleveland to a museum. My wheels started spinning. It was noon. Museums close at 5. It's a 45 minute drive and someone gets cranky between 2 and 4. Hmm... not a great idea. I started looking at museums near us in the Akron/Canton area.
Google never fails. It gave me a list and I started to go through thinking what would be good. The Fossil museum would be cool, but we have a play date there with friends next week. Something else... Then I stumbled upon the MAPS Museum near the Akron Canton Airport. I was leary at first. Not sure what it held. The pictures shows planes but also displays. Lil man, at 3, would certainly not be into displays. I talked it over with hubs and we headed out to check out the museum with the idea that if the museum is not the best for lil man, we would head to Chuck E Cheese.
This museum, while small, is FANTASTIC! I cannot express enough how much I absolutely loved this place. I think I was more in love with it than either of my boys. It was the coolest thing ever. There were planes all over in the gift shop area hanging from the ceiling (what I want to do in lil man's room). There were all kinds of planes everywhere in the museum... hanging from the ceiling, on the ground, outside (thankfully the weather cleared a little). There were descriptions of everything military plane. It was so cool.
 |
| Sitting at the first exhibit- a military gun.... E is rotating the chair, daddy is moving the gun up and down. |
 |
| Switched spots and focused... |


 |
| So glad to see the planes. |
 |
| Super cool glider from the 1920's. |
The greatest surprise came to us while at the museum. We saw in the corner the gondola of the Goodyear Blimp. This is a huge thing in our house. Hubby used to work for the blimp (landing crew) and in our dating years, I would visit him at the hanger and sit in the blimp gondola. What was great about it was it was the exact same gondola he worked with- the GZ22. It had crashed a few years after he left (to settle down and be married to moi. Too much travel for him to be newly married and such) and apparently MAPS got the gondola of the blimp that crashed. The very one I sat in and explored (not that there's much to explore, but I looked into the balloon part of the blimp in that gondola and sat in the pilot's chair. Good times. Hubby said many memories came flooding back and he reminisced with one of the gentlemen working/volunteering with MAPS. Needless to say, this was lil man's favorite part of the museum and he had a ton of fun in the blimp. We sat in there for about 20 minutes just letting him play on one of the two trips to this exhibit.
 |
| Our blimp... see story below. |
 |
| Inside our blimp. |
 |
| The flag hanging from above the cockpit in the blimp. |

 |
| Thought this sign was interesting. The how to make your own radio handouts were gone though. |
 |
| Fox radios you can make using the missing handouts. |
 |
| On the rotor of the blimp |


 |
| You could climb up the ladder and look inside this fighter jet... |

 |
| Not a big space... at all....especially when you consider the gear they have to wear. |
 |
| umm... okay. Didn't think I'd fit anyway... or be able to climb over the gate.... |
 |
| Another favorite for lil man... helicopters. |

 |
| The fastest plane here. |
 |
| Yes, that speed says 1,372 MPH. Yowza! |
 |
| I was in love with this B-25 Bomber It was my favorite. |
 |
| Love this plane. Love love... |
The Heroes Hall was filled with all kinds of really neat things. There were uniforms of all eras displayed, planes and helicopters, various stories of the heroes from the Akron Canton area who served (which was so cool to read). What I loved best about the Heroes Hall was the handwritten pieces they had. There was a handwritten flight log listing the date, time and mission they were on. There were lots of handwritten notes (my favorite things in the world to pour over) to family and friends from these heroes. It was wonderful and beautiful and reminded me of the book I just finished and can't stop thinking about, The Bungalow.
 |
| Various helmets and piloting/air traffiking equipment. |
 |
| various military uniforms for women. |
 |
| Handwritten flight mission log. So cool! |
 |
| He tried to open every display and play with the planes... There were many. |
 |
| Interesting note.... |
 |
| Another handwritten note home from a local hero |
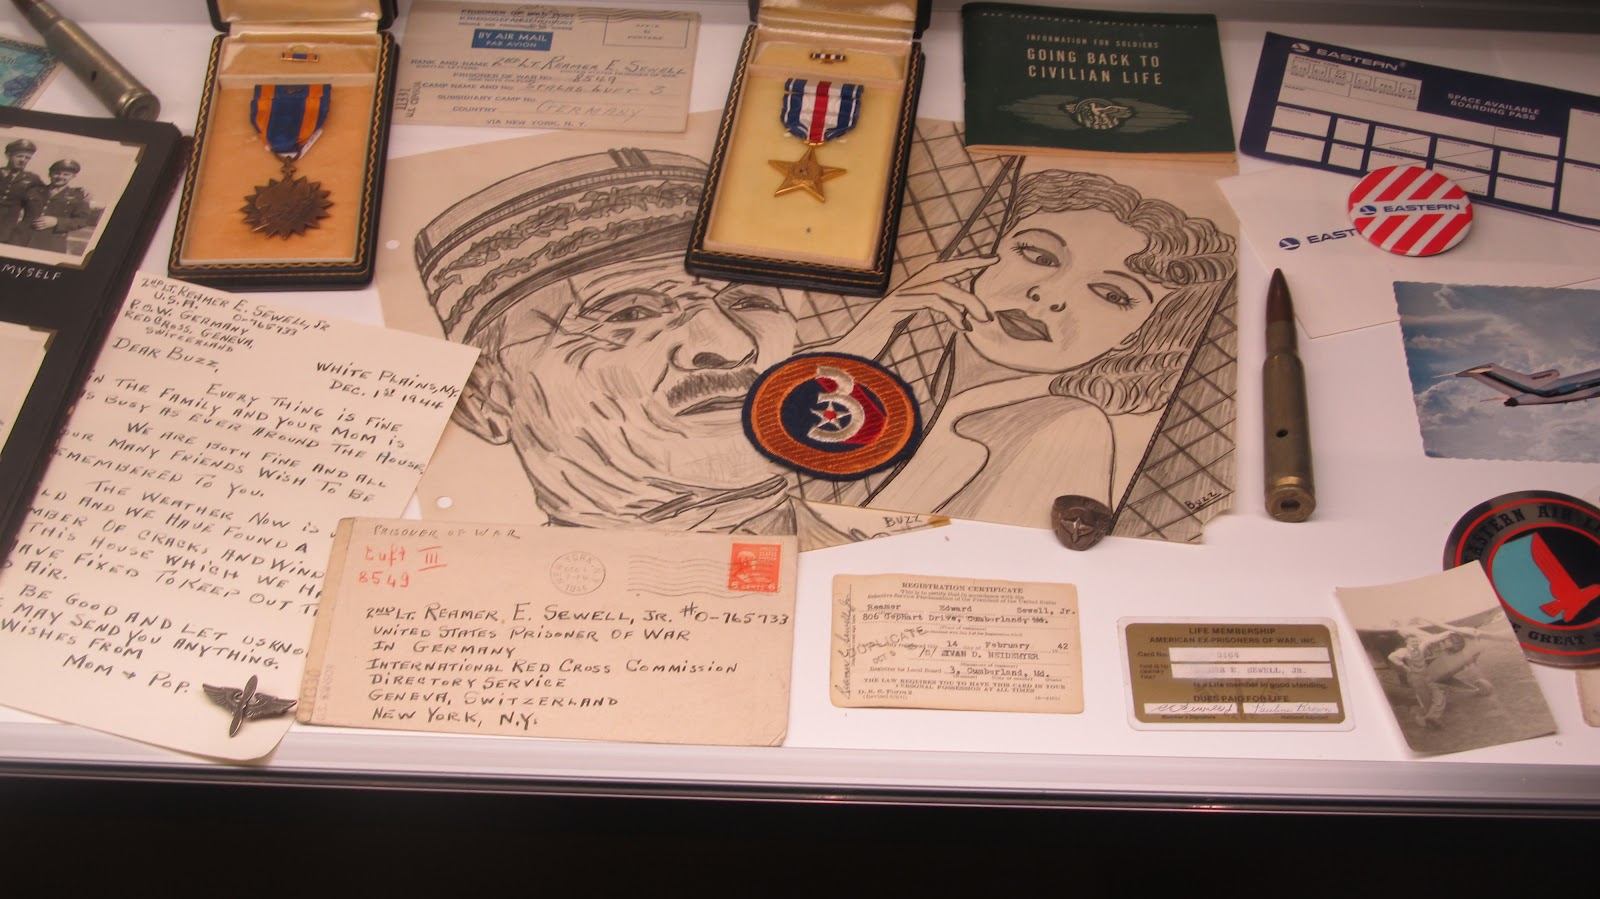 |
| Hobby to pass time- art- by another local hero. |
 |
| Rosie the Riveter display. |
 |
| Cool missles. |
I loved this museum and will be back. I think it may become a semi-annual event. It's fantastic. If that's not enough to convince you to visit, the guest book I signed had people who visited from Oklahoma, Florida and other places who said it was a great museum as well. It really is. We saw kids of all ages who enjoyed it and some on guided tours (not something we can do with our lil man yet).
As always, I was in no way, shape or form compensated for this post. I simply loved this museum and can't wait to go back. It really is a gem.
Tomorrow, we hit our next annual event... The hotair balloon festival for the Football Hall of Fame Inauguration. It's our 3rd year attending. It's something we wouldn't pass up.
Subscribe to:
Comments (Atom)